By utilizing any information on the web site, you represent that you have read and agree to abide by the terms and conditions below. If you rely on any product or procedure described on this web site, you do so at your own risk.
The material that appears on K-NineDobermans.com is for informational purposes only. Nothing on this web site should be considered veterinary advice. Consult with and follow the advice of your vet.
Trimming dog nails can be dangerous. You and your assistants should wear protective eye wear to avoid injury to your eyes and a mask if you are sensitive to dust.
Due to the propensity for animals to behave in an unpredictible manner, muzzle your dog and restrain him/her to protect yourselves and your animal from unforseen accidents.
If you do not agree to these terms and conditions, please do not use this site.
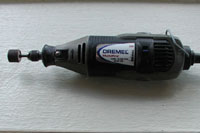
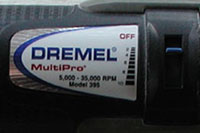
Dremel Dog Nail Grinder
Dremel MultiPro for Dog Nails
Dremel, dog nail grinder
I use a Dremel MultiPro Model 395, with a cord. It is variable speed, 5,000 to 35,000 RPM. They are available at all major building material and hardware stores.
Similar battery operated cordless models are available, but I prefer the 110 Volt model because of the many other ways I use it as a power tool. Power tools can be dangerous to you and your animal.
Because of the manufacturer's tool design, there is no safety guard. If you have a dog with long hair, the hair can get wound around the shaft and/or chuck in the Dremel.
Keep the machine away from all long hair, this includes your hair, your animals coat, even their tail. Tie your own hair back.Trim hair around your dogs nails, or otherwise secure it. Safety is of the upmost concern. Be sure you have read the terms and conditions above before you begin trimming your dog nails.
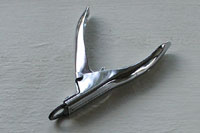
Dog nail trimmers
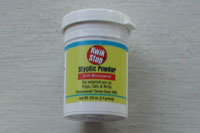
Styptic Powder to help with clotting
Dog Nail Trimmers, Kwik Stop Styptic Powder.
I use guillotine type dog nail clippers. This particular brand, Resco, has rebuild kits that include replacement blades. I seldom replace the blade.
Other styles and brands are available that will work just as well. The one I use was less than $10.
You might also want some styptic powder on hand to help with blood clotting in the event you trim the dog nails too short.
Buy the smallest quantity, I still have the first container I ever purchased.
I have read that corn starch works also, but I have not used it. Both products are available on line at KVPet.com, but they have a $50 minimum order.
Call and get their catalog, 1-800-423-8211. They are a small and large animal supply house.
They also carry the tape used in taping cropped ears.
Be sure you have read the terms and conditions above before you begin trimming your dog nails.
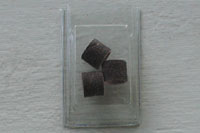
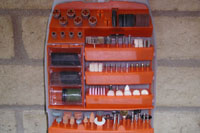
Sanding bands for the Dremel
Dremel Accessory Kit for Dog Nails
Dremel Sanding Bands for Dog Toenails, Dremel Accessories
I use coarse grit sanding bands. You can purchase them at most hardware, variety and building materials stores.
They may also carry a variety of accessories available by individual pieces or like the kit pictured here.
Remember, the Dremel is a dangerous power tool. Be sure you agree to the terms and conditions at the top of the page before you start cutting your dog nails.
Trimming Dog Nails
Clipping Dog Nails
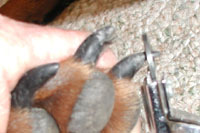
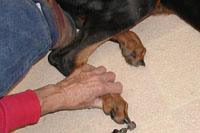
Photo #1, corner position
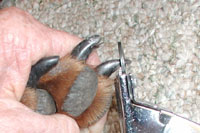
Photo #2, lap position
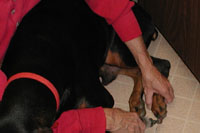
Photo #3, using your heel
How to trim, then dremel dog nails. Trimming and clipping tricks
Have your dog treats handy.
Do not get in a hurry. If you become impatient, your dog will sense this.
Wear comfortable work slacks. I sit in the kitchen floor to do my dog nails.
You will be using a power tool. Wear protective eye wear.
Grinding nails creates dust . Wear a mask if you are sensitive to dust.
Try to do this procedure at night after your dog has eaten. They tend to be lazy and resist less.
Consider putting a muzzle on your dog for your own safety. You will be in close contact with your dog, so I use a fabric one. The metal ones hurt if they thrash and hit you with it.
SEE PHOTO #1 ABOVE
If your dog is new to this procedure, or has had a bad experience in the past, put the dog's hind end in the corner. Sit with your back also to the corner. I aim his butt to the left, lay him over my left leg, so I can use the Dremel or the clippers with my right hand (I am right-handed). My left arm can then help to hold him in place.
Usually if they try to excape, they will try to scramble backwards.With his hind end in the corner, he will have no direction to go but forward.
Talk in a low but firm voice.
If you are using the clippers and he is afraid of them, just have him sniff them and give him a treat. Rub your hands up and down his rear legs, paying particular attention to his feet. Give him several treats, then release him. Lesson over. You may need to repeat this several nights with his rear feet only until he begins to trust you.
If your dog has long hair, clip it, tape it, or otherwise secure it out of the way of the moving mandrel. If the hair gets wound around the rotating shaft, it will yank the hair. It will become a painful awful experiece for your pet. If you are putting the machine on the floor, also watch his tail.
Begin by clipping the very tip of the rear nails.
If this is your pet's first introduction to the Dremel, do not put the mandrel in the machine. Start with the revolutions on low. He may try to sniff it. It will startle him if his nose hits the chuck, but I have not had it truly hurt them, if you are paying attention. Give him a treat and release. Lesson over. Repeat this lesson several times if you need to, until they are ready to move forward to the next level.
Don't let the moving part of the machine connect with the cord, it will cut it in half.
When your pet is comfortable with the sound and feel of the machine alone, inset the mandrel with a coarse grit sanding band. If you are right-handed, hold the outer rear foot, (the one on top) with your left hand, touching a nail with the sanding band. It is not necessary to do a full trim with the first intruduction. The lesson is still about the sound and feel of the dremel. Gradually increase the time your dog will tolerate the grinding. I've read other articles that say to hold the band on the nail no longer than 3 seconds because it becomes hot. I move it around enough that I doubt I create any heat, but use caution because I suppose it is possible. Don't use it like it's a bench grinder, use finesse. Gradually begin to shape the nail.
Remember, the goal is eventually make the nails shorter. Each time you trim, the quick will recede further from the tip of the nail. It is possible to trim every 3 to 4 days, although you will not have as much nail to trim off. Your overall nail length will become shorter over time.
SEE PHOTO #2 ABOVE
After your pet is comfortable with the rear nails, begin on the front nails. Use the same patience and understanding you used with the rears, but expect a little more reaction because he can now see what you are doing front and center. If you gained his trust on the rears, you should be able to do so with the fronts also.
SEE PHOTO #3 ABOVE
Once your pet is familiar with the sound and feel of using a dremel on his nails, you are ready to get him out of your lap and lay him in front of you. If you are right-handed, put his hind end to your left and his front end to the right. Begin in the rear, with the leg he is laying on. It is very difficult for them to pull away in the position, so use caution, do not over-grind if you are new to this position.
If your pet is jerking his top rear leg away from you, either because of natural reflex or misbehavior, hook your ankle (heel) of your left foot behind the knee (you might want to call it his elbow) on the top leg, making it more difficult to pull away from you. Again, don't treat your dremel like it's a bench grinder. Shape your nail, do not hold the sanding band in one particular place for more than a second or two.
Move on to the front nails, keeping in mind that some dogs cannot tolerate the machine. Some of mine look away. They will still cooperate, but just cannot watch the actual procedure. Some adults I know cannot watch when they get a vaccination. I guess it's about the same thing for some dogs.
Be sure you reward your dog with a treat or two when you are finished. Praise him like he laid a "GOLDEN EGG". The "GOLDEN EGG" theory also applies when you are trying to house train your dog.
Remember, trimming dog nails is dangerous. The Dremel is a power tool. Be sure you agree to the terms and conditions at the top of the page before you start trimming dog nails.
Dremel Dog Nails Video
The materials on this site are the property of K-NineDobermans.com and are protected by U. S. copyright laws. Except as explicitly provided in this agreement, you may not distribute, transmit, display, reproduce, modify, or otherwise exploit any of the materials on this site. You may occasionally print a copy of any page on this site for your personal, non-commercial use, but you may not otherwise reproduce any material appearing on this site without the prior written consent of the owner. You may not store any significant portion of, or distribute copies of, materials found on this site, in any form (including electronic form), without the prior written permission from the owner.
ManeGaitFarms.com - FoxTrotters for Sale, Gaited Horse Breeders